How to Lay Insulating Board for Electric Underfloor Heating
When installing electric underfloor heating, one of the most important yet often overlooked components is the insulation board. These boards act as a thermal barrier between your subfloor and heating system, ensuring that the heat travels upward into your room instead of being wasted beneath the floor. By laying insulation boards correctly, you can improve heating efficiency, reduce running costs, and achieve faster warm-up times. In this step-by-step guide, we’ll walk homeowners and DIY enthusiasts through the process of preparing, fitting, and securing insulation boards for electric heating helping you get the most from your underfloor heating system.
Why Insulating Boards Are Important
Insulating boards are essential for maximising the performance of electric underfloor heating systems. Without proper insulation, a significant portion of heat can be lost through the subfloor, especially in ground-level rooms or concrete bases. By installing insulation boards, you ensure that more heat radiates upward into your living space improving comfort while lowering energy consumption. This not only results in reduced running costs but also ensures even heat distribution throughout the room. In short, insulation boards make your electric heating system more efficient, eco-friendly, and cost-effective in the long term.
Tools and Materials You’ll Need
Before you start, gather the following tools and materials:
- Insulation boards (check thickness suitable for your floor type)
- Flexible tile adhesive or primer
- Notched trowel
- Measuring tape and pencil
- Utility knife or saw
- Screws and washers (for mechanical fixing if required)
- Spirit level
When choosing insulation boards, consider their thermal resistance, material, and thickness. Common options include XPS foam boards for tiled floors or cement-coated boards for added rigidity.
Preparing the Subfloor
Preparation is key to a successful installation. Start by ensuring your subfloor is dry, clean, and level. Sweep away any dust, debris, or loose material that might affect adhesion. If the subfloor has cracks or uneven spots, fill and smooth them using a suitable floor levelling compound. For highly absorbent or dusty surfaces, applying a primer helps improve the bond between the adhesive and subfloor. It’s also crucial to check moisture levels, particularly on concrete bases trapped dampness can damage insulation and heating cables. Once the area is prepped and fully dry, you’re ready to begin laying the insulation boards.
Step-by-Step Guide to Laying Insulating Boards
Step 1: Measure and Plan
Before laying anything down, measure your room and plan the board layout. Mark out the positions on the subfloor to minimise cuts and reduce waste. Always start from a straight wall.
Step 2: Cut Boards to Size
Use a utility knife or fine-tooth saw to cut boards as needed. Ensure edges are neat so they fit snugly without gaps.
Step 3: Apply Adhesive or Primer
Spread a thin layer of flexible tile adhesive over the subfloor using a notched trowel. Apply only enough adhesive for one or two boards at a time to prevent drying out.
Step 4: Lay the Boards
Place each insulation board onto the adhesive, pressing down firmly to ensure a strong bond. Stagger the joints between rows for added stability and check with a spirit level to maintain an even surface.
Step 5: Fix in Place (Optional)
For extra security especially on wooden subfloors you can mechanically fix the boards using screws and washers. Avoid over-tightening to prevent damage.
Step 6: Seal the Joints
Although not always required, sealing the joints with aluminium tape or a suitable sealant improves moisture resistance and prevents heat loss through small gaps.
Once completed, you’ll have a solid, level, and insulated base ready for your electric heating system.
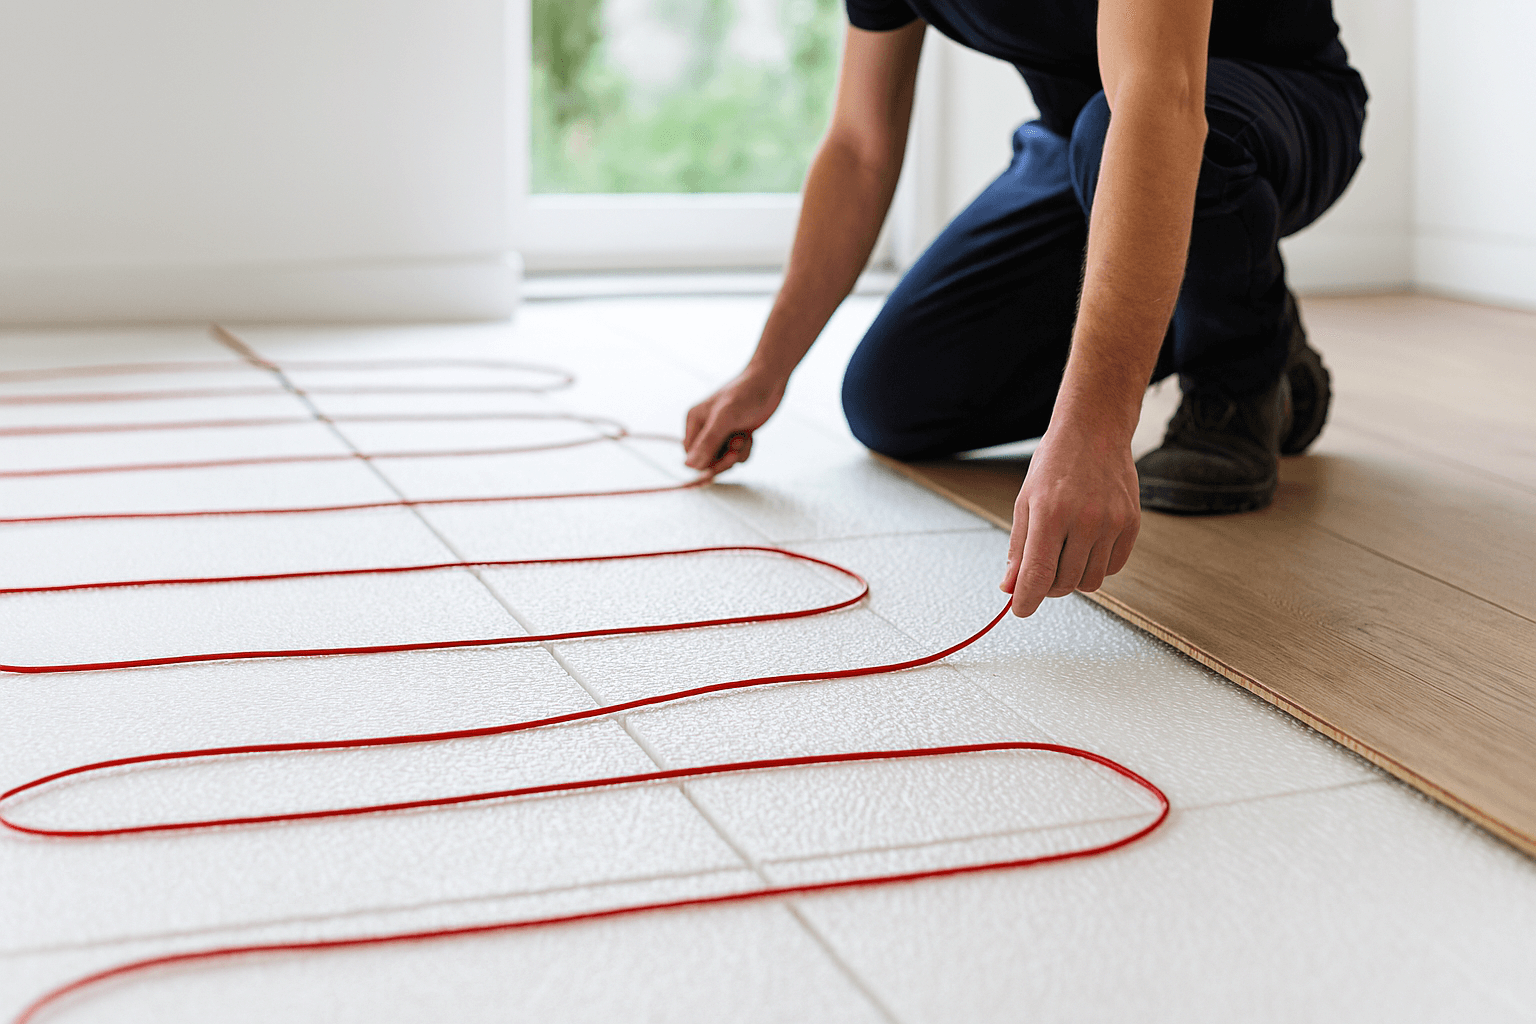
Installing Electric Underfloor Heating on Top
After the insulation boards are laid, it’s time to install your electric underfloor heating mats or cables. These are placed directly on top of the insulation layer according to the manufacturer’s layout guide. Secure the heating elements carefully and ensure there’s no overlap. Before applying your final floor covering (tiles, laminate, or vinyl), test the heating system to confirm it’s working correctly. This helps identify any issues before they’re sealed beneath the floor. Following these steps ensures optimal performance and long-term reliability of your underfloor heating system.
Common Mistakes to Avoid
Avoid common errors such as:
- Laying insulation boards on an uneven or damp floor.
- Leaving gaps between boards that cause heat loss.
- Using the wrong adhesive or skipping primer.
Taking the time to prepare and use the right materials ensures a long-lasting, efficient installation.
Conclusion & Final Tips
Installing insulation boards for electric heating is one of the smartest steps you can take to boost system efficiency and home comfort. Properly laid boards help retain warmth, reduce energy waste, and extend the life of your heating system. If you’re unsure about materials or floor conditions, it’s always best to consult a professional installer. With the right preparation and care, your underfloor heating will deliver consistent warmth, energy efficiency, and lasting performance keeping your home cosy all year round.
Ready to upgrade your heating setup? Start with quality insulation boards and expert advice from The Underfloor Heating Expert.