How to Connect Heatmiser neoHub: The Complete UK Homeowner’s Guide
The smart heating revolution is transforming how UK homeowners manage comfort and energy costs. At the centre of this innovation is the Heatmiser neoHub, a powerful device that connects your underfloor heating or radiator system to the internet, enabling remote control through the Heatmiser Neo app.
Yet, many homeowners feel daunted when it comes to setup. Conflicting online guides, technical jargon, and compatibility questions can make the process feel overwhelming.
This comprehensive guide from theunderfloorheatingexpert.com is designed to eliminate the guesswork. We’ll walk you step by step through how to connect your Heatmiser neoHub, from physical installation to Wi-Fi pairing, ensuring your smart heating system is ready to deliver convenience and savings.
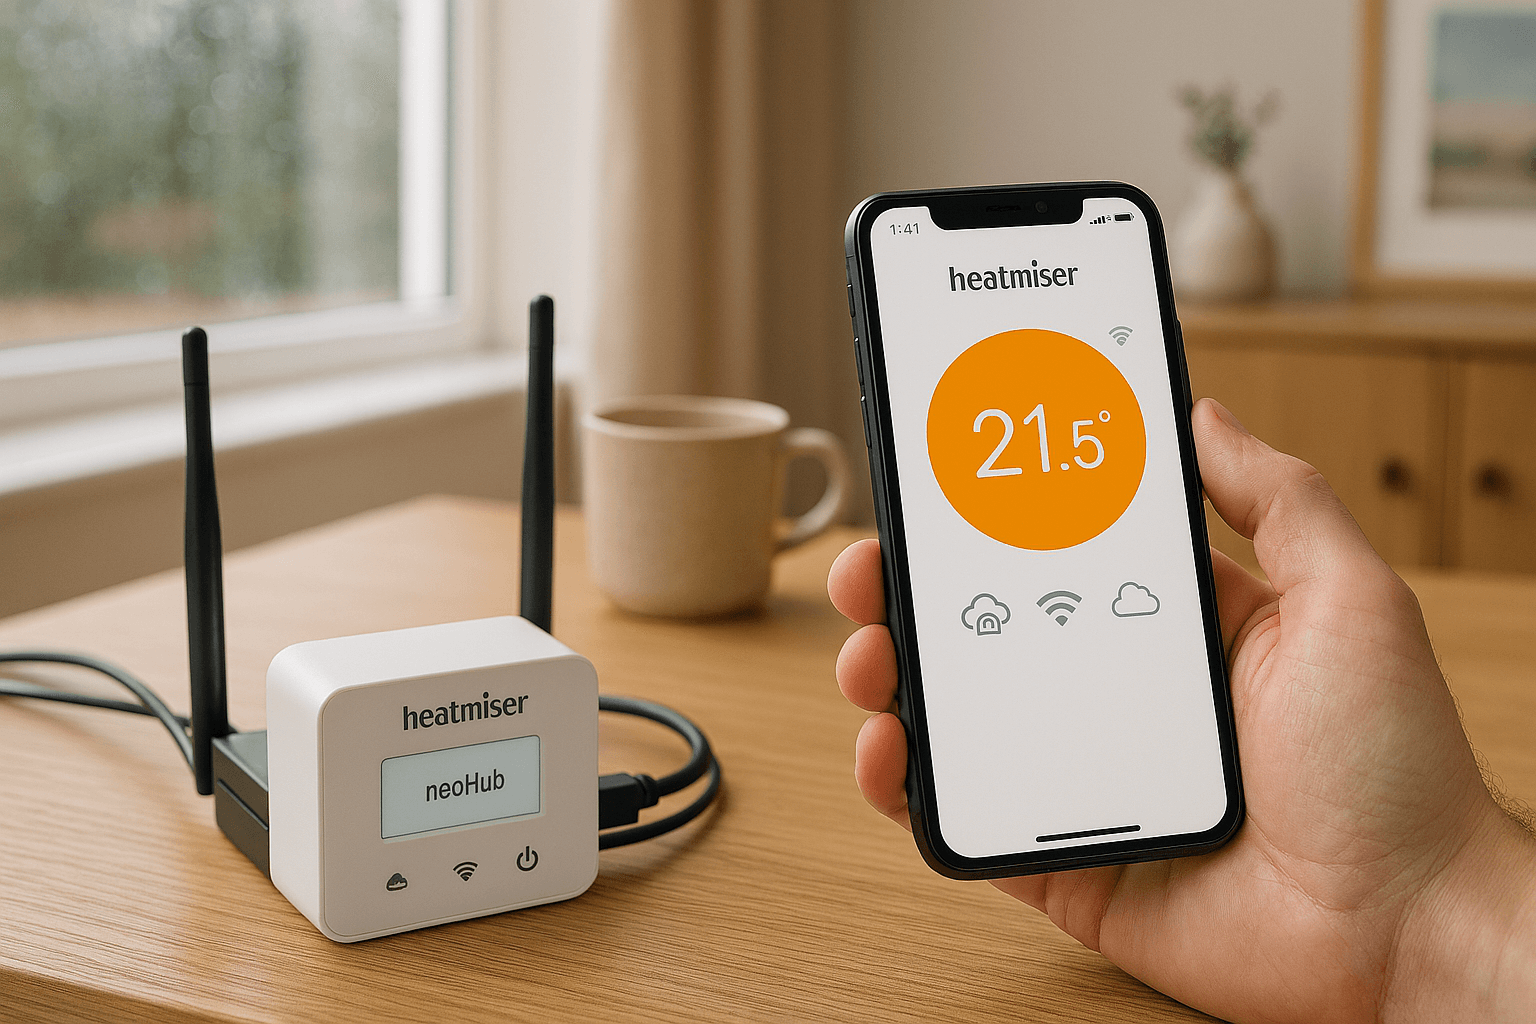
What is the Heatmiser neoHub?
The Heatmiser neoHub acts as the gateway between your Heatmiser thermostats and your smartphone or tablet. It allows you to:
- Control your heating from anywhere via the Heatmiser Neo app
- Set schedules and temperatures room by room
- Monitor energy usage
- Receive alerts for system faults
For homeowners seeking modern energy efficiency and flexible control, the neoHub is an essential investment.
Before You Begin: Essential Checks
Before diving into the installation, ensure:
✅ Your home Wi-Fi network is stable and working.
✅ You know your Wi-Fi name (SSID) and password.
✅ You have an available Ethernet port on your router (for neoHub Gen 1) or Wi-Fi credentials ready (for neoHub Gen 2).
✅ Your Heatmiser thermostats are correctly installed and powered.
✅ You’ve downloaded the Heatmiser Neo app from the App Store or Google Play.
Step 1 – Connecting the neoHub Hardware
neoHub Gen 1 (Ethernet)
- Plug the supplied Ethernet cable into your neoHub and the other end into your home router.
- Connect the neoHub power supply and switch it on.
- Observe the LEDs:
- Power LED should be solid
- Internet LED should blink or become solid once connected
neoHub Gen 2 (Wi-Fi Enabled)
- Connect the neoHub G2 power supply.
- Press and hold the “Pair” button for approximately 10 seconds until the Wi-Fi LED starts blinking rapidly.
- On your smartphone, go to Wi-Fi settings and connect to the neoHub’s temporary Wi-Fi network (usually named “neoHub_xxxx”).
- Open the Heatmiser Neo app and follow on-screen instructions to select your home Wi-Fi network and enter the password.
- The neoHub will reboot and connect to your Wi-Fi.
Tip from theunderfloorheatingexpert.com: If pairing fails, move the neoHub closer to your router during initial setup, then relocate if needed once paired.
Step 2 – Pairing neoHub with Thermostats
Once the neoHub is connected to your network:
- Open the Heatmiser Neo app.
- Create a new account or sign in if you already have one.
- Tap “Add Device” and select “neoHub.”
- Follow prompts to search for nearby Heatmiser thermostats.
- When prompted, press and hold the pairing button on your thermostat until the app confirms connection.
Your neoHub should detect all compatible thermostats automatically.
Step 3 – Configuring the Heatmiser Neo App
Once paired, the app will allow you to:
- Name each room
- Set heating schedules
- Adjust target temperatures
- Monitor real-time status
theunderfloorheatingexpert.com recommends testing manual control of each zone through the app to confirm everything responds correctly.
Troubleshooting Common neoHub Issues
Even with precise steps, you might run into issues. Here’s how to tackle common problems:
neoHub Won’t Connect to Wi-Fi
- Double-check Wi-Fi password accuracy.
- Ensure your router’s 2.4GHz network is enabled (neoHub Gen 2 doesn’t support 5GHz).
- Restart the neoHub and router.
- Try moving the neoHub closer to the router.
Thermostats Not Detected
- Ensure thermostats have power and are within wireless range.
- Repeat pairing process in the app.
- Check for firmware updates in the Neo app.
App Can’t Find neoHub
- Verify the neoHub LEDs indicate a network connection.
- Restart your smartphone and close/reopen the Neo app.
Why Choose Heatmiser neoHub for Your Smart Heating?
The Heatmiser neoHub isn’t just a convenience, it’s a genuine efficiency tool. Benefits include:
- Energy Savings – Control heating precisely, reducing unnecessary usage.
- Remote Access – Adjust heating while away from home.
- Custom Zones – Heat only the rooms you’re using.
- Integration Ready – neoHub G2 works with smart assistants like Alexa and Google Home.
By following this guide, you’ll unlock the full potential of your Heatmiser neoHub and enjoy lower bills and enhanced comfort.
Final Thoughts: Partner with theunderfloorheatingexpert.com
Installing your neoHub might seem technical, but with the right guidance, it’s straightforward. Whether you’re upgrading an underfloor heating system or adding smart controls to radiators, theunderfloorheatingexpert.com is your trusted UK partner for expertise, products, and professional advice.
Ready to enjoy smarter heating? Explore our latest guides, installation services, and Heatmiser product range at theunderfloorheatingexpert.com.
Thinking about upgrading your heating? Contact our experts today for tailored advice on choosing and installing your Heatmiser neoHub!